### What?
fix typos in doc
### Why?
because they are typos
### How?
checked manually with the help of AI
201 lines
11 KiB
Plaintext
201 lines
11 KiB
Plaintext
---
|
|
title: Authentication Overview
|
|
label: Overview
|
|
order: 10
|
|
desc: Payload provides highly secure user Authentication out of the box, and you can fully customize, override, or remove the default Authentication support.
|
|
keywords: authentication, config, configuration, overview, documentation, Content Management System, cms, headless, javascript, node, react, nextjs
|
|
---
|
|
|
|
<YouTube
|
|
id="CT4KafeJjTI"
|
|
title="Simplified Authentication for Headless CMS: Unlocking Reusability in One Line"
|
|
/>
|
|
|
|
Authentication is a critical part of any application. Payload provides a secure, portable way to manage user accounts out of the box. Payload Authentication is designed to be used in both the [Admin Panel](../admin/overview), as well as your own external applications, completely eliminating the need for paid, third-party platforms and services.
|
|
|
|
Here are some common use cases of Authentication in your own applications:
|
|
|
|
- Customer accounts for an e-commerce app
|
|
- User accounts for a SaaS product
|
|
- P2P apps or social sites where users need to log in and manage their profiles
|
|
- Online games where players need to track their progress over time
|
|
|
|
When Authentication is enabled on a [Collection](../configuration/collections), Payload injects all necessary functionality to support the entire user flow. This includes all [auth-related operations](./operations) like account creation, logging in and out, and resetting passwords, all [auth-related emails](./email) like email verification and password reset, as well as any necessary UI to manage users from the Admin Panel.
|
|
|
|
To enable Authentication on a Collection, use the `auth` property in the [Collection Config](../configuration/collections#config-options):
|
|
|
|
```ts
|
|
import type { CollectionConfig } from 'payload'
|
|
|
|
export const Users: CollectionConfig = {
|
|
// ...
|
|
auth: true, // highlight-line
|
|
}
|
|
```
|
|
|
|
|
|
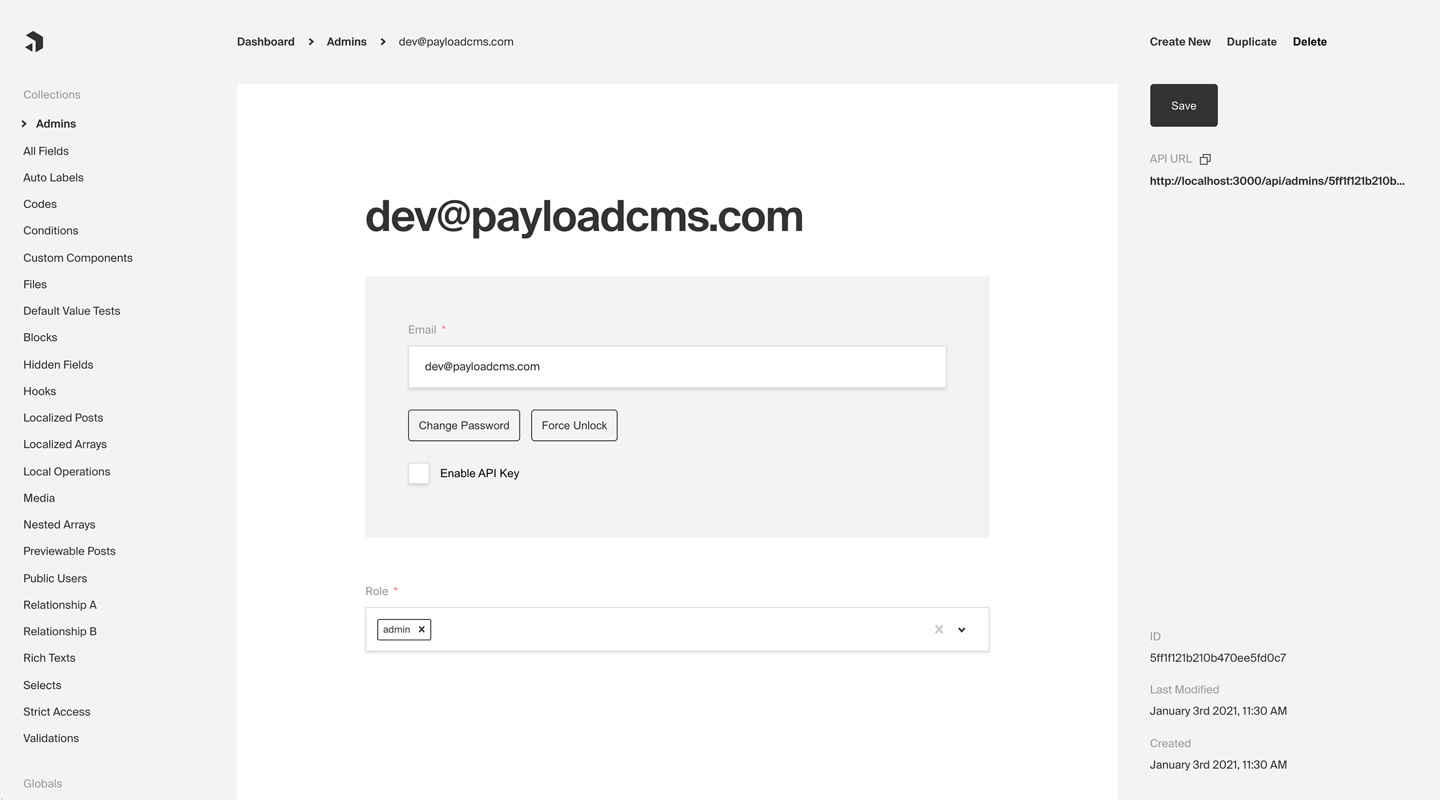
_Admin Panel screenshot depicting an Admins Collection with Auth enabled_
|
|
|
|
## Config Options
|
|
|
|
Any [Collection](../configuration/collections) can opt-in to supporting Authentication. Once enabled, each Document that is created within the Collection can be thought of as a "user". This enables a complete authentication workflow on your Collection, such as logging in and out, resetting their password, and more.
|
|
|
|
<Banner type="warning">
|
|
**Note:** By default, Payload provides an auth-enabled `User` Collection which
|
|
is used to access the Admin Panel. [More
|
|
details](../admin/overview#the-admin-user-collection).
|
|
</Banner>
|
|
|
|
To enable Authentication on a Collection, use the `auth` property in the [Collection Config](../configuration/collections):
|
|
|
|
```ts
|
|
import type { CollectionConfig } from 'payload'
|
|
|
|
export const Admins: CollectionConfig = {
|
|
// ...
|
|
// highlight-start
|
|
auth: {
|
|
tokenExpiration: 7200, // How many seconds to keep the user logged in
|
|
verify: true, // Require email verification before being allowed to authenticate
|
|
maxLoginAttempts: 5, // Automatically lock a user out after X amount of failed logins
|
|
lockTime: 600 * 1000, // Time period to allow the max login attempts
|
|
// More options are available
|
|
},
|
|
// highlight-end
|
|
}
|
|
```
|
|
|
|
<Banner type="info">
|
|
**Tip:** For default auth behavior, set `auth: true`. This is a good starting
|
|
point for most applications.
|
|
</Banner>
|
|
|
|
<Banner type="warning">
|
|
**Note:** Auth-enabled Collections will be automatically injected with the
|
|
`hash`, `salt`, and `email` fields. [More
|
|
details](../fields/overview#field-names).
|
|
</Banner>
|
|
|
|
The following options are available:
|
|
|
|
| Option | Description |
|
|
| ------------------------------ | --------------------------------------------------------------------------------------------------------------------------------------------------------------------------------------------------------------------------- |
|
|
| **`cookies`** | Set cookie options, including `secure`, `sameSite`, and `domain`. For advanced users. |
|
|
| **`depth`** | How many levels deep a `user` document should be populated when creating the JWT and binding the `user` to the `req`. Defaults to `0` and should only be modified if absolutely necessary, as this will affect performance. |
|
|
| **`disableLocalStrategy`** | Advanced - disable Payload's built-in local auth strategy. Only use this property if you have replaced Payload's auth mechanisms with your own. |
|
|
| **`forgotPassword`** | Customize the way that the `forgotPassword` operation functions. [More details](./email#forgot-password). |
|
|
| **`lockTime`** | Set the time (in milliseconds) that a user should be locked out if they fail authentication more times than `maxLoginAttempts` allows for. |
|
|
| **`loginWithUsername`** | Ability to allow users to login with username/password. [More](/docs/authentication/overview#login-with-username) |
|
|
| **`maxLoginAttempts`** | Only allow a user to attempt logging in X amount of times. Automatically locks out a user from authenticating if this limit is passed. Set to `0` to disable. |
|
|
| **`removeTokenFromResponses`** | Set to true if you want to remove the token from the returned authentication API responses such as login or refresh. |
|
|
| **`strategies`** | Advanced - an array of custom authentication strategies to extend this collection's authentication with. [More details](./custom-strategies). |
|
|
| **`tokenExpiration`** | How long (in seconds) to keep the user logged in. JWTs and HTTP-only cookies will both expire at the same time. |
|
|
| **`useAPIKey`** | Payload Authentication provides for API keys to be set on each user within an Authentication-enabled Collection. [More details](./api-keys). |
|
|
| **`verify`** | Set to `true` or pass an object with verification options to require users to verify by email before they are allowed to log into your app. [More details](./email#email-verification). |
|
|
|
|
### Login With Username
|
|
|
|
You can allow users to login with their username instead of their email address by setting the `loginWithUsername` property to `true`.
|
|
|
|
Example:
|
|
|
|
```ts
|
|
{
|
|
slug: 'customers',
|
|
auth: {
|
|
loginWithUsername: true,
|
|
},
|
|
}
|
|
```
|
|
|
|
Or, you can pass an object with additional options:
|
|
|
|
```ts
|
|
{
|
|
slug: 'customers',
|
|
auth: {
|
|
loginWithUsername: {
|
|
allowEmailLogin: true, // default: false
|
|
requireEmail: false, // default: false
|
|
},
|
|
},
|
|
}
|
|
```
|
|
|
|
**`allowEmailLogin`**
|
|
|
|
If set to `true`, users can log in with either their username or email address. If set to `false`, users can only log in with their username.
|
|
|
|
**`requireEmail`**
|
|
|
|
If set to `true`, an email address is required when creating a new user. If set to `false`, email is not required upon creation.
|
|
|
|
## Auto-Login
|
|
|
|
For testing and demo purposes you may want to skip forcing the user to login in order to access your application. Typically, all users should be required to login, however, you can speed up local development time by enabling auto-login.
|
|
|
|
To enable auto-login, set the `autoLogin` property in the [Payload Config](../admin/overview#admin-options):
|
|
|
|
```ts
|
|
import { buildConfig } from 'payload'
|
|
|
|
export default buildConfig({
|
|
// ...
|
|
// highlight-start
|
|
autoLogin:
|
|
process.env.NEXT_PUBLIC_ENABLE_AUTOLOGIN === 'true'
|
|
? {
|
|
email: 'test@example.com',
|
|
password: 'test',
|
|
prefillOnly: true,
|
|
}
|
|
: false,
|
|
// highlight-end
|
|
})
|
|
```
|
|
|
|
<Banner type="warning">
|
|
**Warning:** The recommended way to use this feature is behind an [Environment
|
|
Variable](../configuration/environment-vars). This will ensure it is
|
|
_disabled_ in production.
|
|
</Banner>
|
|
|
|
The following options are available:
|
|
|
|
| Option | Description |
|
|
| ----------------- | --------------------------------------------------------------------------------------------------------------- |
|
|
| **`username`** | The username of the user to login as |
|
|
| **`email`** | The email address of the user to login as |
|
|
| **`password`** | The password of the user to login as. This is only needed if `prefillOnly` is set to true |
|
|
| **`prefillOnly`** | If set to true, the login credentials will be prefilled but the user will still need to click the login button. |
|
|
|
|
## Operations
|
|
|
|
All auth-related operations are available via Payload's REST, Local, and GraphQL APIs. These operations are automatically added to your Collection when you enable Authentication. [More details](./operations).
|
|
|
|
## Strategies
|
|
|
|
Out of the box Payload ships with a three powerful Authentication strategies:
|
|
|
|
- [HTTP-Only Cookies](./cookies)
|
|
- [JSON Web Tokens (JWT)](./jwt)
|
|
- [API-Keys](./api-keys)
|
|
|
|
Each of these strategies can work together or independently. You can also create your own custom strategies to fit your specific needs. [More details](./custom-strategies).
|
|
|
|
### HTTP-Only Cookies
|
|
|
|
[HTTP-only cookies](https://developer.mozilla.org/en-US/docs/Web/HTTP/Cookies) are a highly secure method of storing identifiable data on a user's device so that Payload can automatically recognize a returning user until their cookie expires. They are totally protected from common XSS attacks and **cannot be read by JavaScript in the browser**, unlike JWT's. [More details](./cookies).
|
|
|
|
### JSON Web Tokens
|
|
|
|
JWT (JSON Web Tokens) can also be utilized to perform authentication. Tokens are generated on `login`, `refresh` and `me` operations and can be attached to future requests to authenticate users. [More details](./jwt).
|
|
|
|
### API Keys
|
|
|
|
API Keys can be enabled on auth collections. These are particularly useful when you want to authenticate against Payload from a third party service. [More details](./api-keys).
|
|
|
|
### Custom Strategies
|
|
|
|
There are cases where these may not be enough for your application. Payload is extendable by design so you can wire up your own strategy when you need to. [More details](./custom-strategies).
|